
This post was written by Tim who is taking part in the project this year:-
One of the tasks we hoped to achieve in our project was to observe the transit of an exoplanet. By taking images of a star over an extended period, we should see a small dip in the luminosity as an exoplanet passes in front of it.
The dip in flux of photons tends to be very small (in the order of 0.2-0.5%), so before embarking on this task, we needed to ask the question: What transits are we likely to be able to detect? Tim went about simulating a transit to see how reliable our data is likely to be.
Note: At the end of each section, the Python code that was used is included for future reference.
Step 1: Finding the error in flux from our images
The first step was to find out how much the flux varies in our images of stars that are not undergoing a transit. From working on our HR diagram, we had 9 photos (of each filter) of Messier 47. A star was chosen at random and the standard deviation of photon counts for that star across all 9 B images was calculated, giving us a standard deviation of 0.094516 (as a fraction of total photon count) for a 20 second exposure.
Code:
### 0. Locating objects in FIT file ###

import numpy as np, pandas as pd
import imageio
import matplotlib.pyplot as plt

from scipy import ndimage
from scipy import misc
from astropy.io import fits
from scipy.spatial import distance

from collections import namedtuple
import os

def total_intensity_image(input_voxels, threshold):
    voxels_copy = np.copy(input_voxels)
    threshold_indices = voxels_copy < threshold
    voxels_copy[threshold_indices] = 0
    return(voxels_copy.flatten().sum())

def threshold_image(input_voxels, threshold):
    voxels_copy = np.copy(input_voxels)
    threshold_indices = voxels_copy < threshold     voxels_copy[threshold_indices] = 0     plt.imshow(voxels_copy)     plt.title('Image with threshold at '+str(threshold))     plt.show()      def get_optimal_threshold(input_voxels, start=2, stop=9, num=300):     """     The optimal threshold is defined as the value for which the      second derivative of the total intensity is maximum     """     array = np.linspace(start,stop,num)     intensities = [total_intensity_image(input_voxels, i) for i in array]     array_deriv1 = array[2:]     intensities_deriv1 = [(y2-y0)/(x2-x0) for x2, x0, y2, y0 in zip(array_deriv1, array, intensities[2:], intensities)]     array_deriv2 = array_deriv1[2:]     intensities_deriv2 = [(y2-y0)/(x2-x0) for x2, x0, y2, y0 in zip(array_deriv2, array_deriv1, intensities_deriv1[2:], intensities_deriv1)]     return(array_deriv2[np.where(intensities_deriv2 == max(intensities_deriv2))]) GFiltering = namedtuple('GFiltering', ['filteredImage','segrObjects', 'nbrObjects' ,'comX', 'comY']) #defining named tuple containing (1) labeled voxels,\ #(2) integer number of different objetcs, (3) array of x-ccord of centers of mass for all objects, (4) same for y def gaussian_filtering(input_voxels, blur_radius):     # Gaussian smoothing     img_filtered = ndimage.gaussian_filter(input_voxels, blur_radius)     threshold = get_optimal_threshold(input_voxels)     # Using NDImage     labeled, nr_objects = ndimage.label(img_filtered > threshold)

    # Compute Centers of Mass
    centers_of_mass = np.array(ndimage.center_of_mass(input_voxels, labeled, range(1, nr_objects+1)))
    array_com_x = [i[1] for i in centers_of_mass]
    array_com_y = [i[0] for i in centers_of_mass]

    return(GFiltering(img_filtered, labeled, nr_objects, array_com_x, array_com_y))


### 1. Retrieving coordinates and photons counts from a folder of fits files ###

# Take a single fits file, return data from with coordinates, sizes and photon counts of each star
def get_stars_from_fits(file):
    voxels = fits.open(file)[0].data
    data = gaussian_filtering(np.log10(voxels), 7) # This just find object locations, we won't actually use log10

    stars = []
    for star_label in range (1, data.nbrObjects + 1):
        objectCoord = np.where(data.segrObjects == star_label)
        zipped_list = np.array(list(zip(objectCoord[1], objectCoord[0], voxels[objectCoord])))

        coords = np.average(zipped_list[:,:2], axis=0, weights=zipped_list[:,2])
        size = len(objectCoord[0])
        photon_count = voxels[objectCoord].sum()

        stars.append({'coords': coords, 'size': size, 'photon_count': photon_count})
    return pd.DataFrame(stars)

# Repeat above function for an entire folder (returns list of DataFrame, each item being data from one image)
def get_stars_from_folder(folder):
    filenames = os.listdir(folder)
    data = []
    for filename in filenames:
        if '.fit' in filename:
            data.append(get_stars_from_fits(folder+filename))
    return data


### 2. Aligning images based on largest star so we can later match stars between files ###

# Get data from largest star in an image
def get_largest_star(image):
    return image[image['size'] == image['size'].max()].iloc[0]

# Get coordinates of largest star in image
def get_largest_star_coords(image):
    return get_largest_star(image).coords

# Take the full data set and return the image with most stars for calibrating against
def choose_calib_image(images):
    max_stars = max([image.shape[0] for image in images])
    return [image for image in images if image.shape[0]==max_stars][0]

# Take an image and align so largest star matches location with calibration image
def align_against_calib_image(image, calib_image):
    largest_star_coords = get_largest_star_coords(image)
    calib_image_coords = get_largest_star_coords(calib_image)

    image.coords = image.coords + calib_image_coords - largest_star_coords

# Take set of images and align them all against calibration image
def align_all_against_calib_image(images, calib_image):
    for image in images: align_against_calib_image(image, calib_image)

# Take the full data set, get all images, choose calibration images automatically and align all against it
def align_all_auto(images):
    align_all_against_calib_image(images, choose_calib_image(images))
    return images


### 3. Matching stars between multiple images to group into one DataFrame ###

# Get distance to all stars in file from specified coords. Outputs list of tuples (star object, distance)
def get_star_distances(coords, image):
    star_distances = [] # list of tuples: (star, distance)
    for i, star in image.iterrows():
        star_distances.append((star, distance.euclidean(coords, star.coords)))
    return star_distances

# Get closest star to particular coords in an image. Returns tuple (star object, distance)
def get_closest_star(coords, image):
    star_distances = get_star_distances(coords, image)
    smallest_distance = min([star_distance[1] for star_distance in star_distances])
    return [star_distance for star_distance in star_distances if star_distance[1]==smallest_distance][0]

# Take coordinates (x,y), and go through images selecting nearest stars. Ignore if too far away.
def find_matching_stars(coords, images, max_distance=10):
    closest_stars = []
    for image in images:
        (star, distance) = get_closest_star(coords, image)
        if distance < max_distance:
            closest_stars.append(star)
    return {'coords': coords, 'closest_stars': pd.DataFrame(closest_stars)}

# Returns list of tuples (x,y) of star coordinates from an image
def list_all_coords(image):
    return [star.coords for i, star in image.iterrows()]

# Repeat find_matching_stars for all stars in a file, output pandas DataFrame
def match_all_stars(image, images, max_distance=10):
    full_star_list = []
    for coords in list_all_coords(image):
        matching_stars = find_matching_stars(coords, images, max_distance)['closest_stars']
        if len(matching_stars) == len(images): # Only include stars found in all files
            full_star_list.append({'coords': coords, 'matched_stars': matching_stars})
    return pd.DataFrame(full_star_list)

# Same as match_all_stars but takes entire data set and chooses calibration files by itself
def match_all_stars_auto(images, max_distance=10):
    images = align_all_auto(images)
    return match_all_stars(choose_calib_image(images), images, max_distance)


### 4. Finally retrieving the data we actually want ###

def aggregate_star_data(images):
    data = match_all_stars_auto(images)

    stars = []
    for i, star in data.iterrows():
        coords = tuple(star.coords)
        photon_counts = star.matched_stars.photon_count.values
        sizes = star.matched_stars['size'].values # Had to use [''] notation because of my stupid naming
        stars.append({
            'coords': coords,
            'avg_photon_counts': np.mean(photon_counts),
            'avg_size': np.mean(sizes),
            'standard_deviation_photon_counts': np.std(photon_counts),
            'coeff_of_var_photon_counts': np.std(photon_counts) / np.mean(photon_counts)
        })
    return pd.DataFrame(stars)

folder = 'FIT_Files/' # Make sure to include '/' after folder name
data = get_stars_from_folder(folder)
aggregate_star_data = aggregate_star_data(data)
aggregate_star_data.to_csv('CSV/combined_star_data.csv') # Save the data for use later
aggregate_star_data
Step 2: Finding a functional form for light curves
Next, to help generate functions for simulating a transit, data was taken from a transit of HIP 41378, which was observed by the Kepler space telescope (https://archive.stsci.edu/k2/hlsp/k2sff/search.php, dataset K2SFF211311380-C18). This shows how flux changes over a few days. At around 3439 days, there is a clear dip in the data where a transit took place:

Zooming in on this dip, we start to see the shape of the “light curve” we are looking for:

After a bit of trial and error and help from Malcolm, a curve was fitted over this which could be used for simulations.
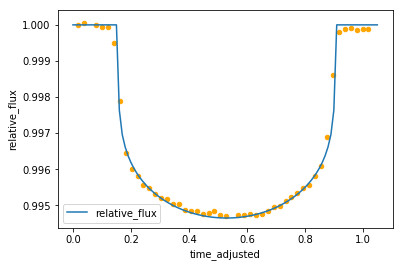
The formula for the curved part finally came out as

where
- Φrel = Relative flux (1.0 being flux when no transit)
- A = Amplitude (maximum dip in relative flux)
- T = Length of time of transit (days)
- t = time (days)
- t0 = Time of minimum flux (i.e. time halfway through transit)
With this equation, the parameters can now be varied as we like.
Code:
### 0. Imports ###

import pandas as pd
import numpy as np
import matplotlib.pyplot as plt
import os


### 1. Get some sample data from an actual exoplanet transit ###

# Read the data and plot the relative flux over time
filepath = 'Kepler_Data/test-light-curve-data.csv'
sample_data = pd.read_csv(filepath)
sample_data = sample_data.rename(index=str, columns={"BJD - 2454833": "time", "Corrected Flux": "relative_flux"})
sample_data.plot(x='time', y='relative_flux')

# zooming in to the transit (secton with big dip) and normalising so flux starts at 1.0
start_time = 3437.55
end_time = 3438.61
transit_data_length = end_time - start_time#

sample_data = sample_data.drop(sample_data[(sample_data['time'] < 3437.55) | (sample_data['time'] > 3438.61)].index)
sample_data['relative_flux'] = sample_data['relative_flux'] / sample_data['relative_flux'][0]
sample_data.plot.scatter(x='time', y='relative_flux', ylim=[0.994, 1.001])

# Adjusting to start at time=0
sample_data['time_adjusted'] = sample_data.time - start_time
sample_data.plot.scatter(x='time_adjusted', y='relative_flux', ylim=[0.994, 1.001])


### 2. Creating a functional form for this data ###

## 2.1 Fitting a curve to the data##

# Just a quick function to help in the formula below
# Return x^exponent if x>=0, (-x)^exponent if x<0 def real_power(x, exponent):     if x >= 0: return x**exponent
    else: return -(-x)**exponent

relative_flux_range = relative_flux_range = max(sample_data.relative_flux) - min(sample_data.relative_flux)
time = np.arange(0.0, transit_data_length, 0.01)
time_centre_of_transit = transit_data_length / 2

# After fiddling around the below formula seems to fit for during the transit (but not outside)
relative_flux_curve = [1.0 - relative_flux_range*(real_power(np.cos((4.2*(x-time_centre_of_transit))), 0.2)) for x in time]

transit_curve = pd.DataFrame({'time': time, 'relative_flux': relative_flux_curve})
# Set all points outside of the transit to 1.0
transit_curve.loc[transit_curve['relative_flux'] > 1, 'relative_flux'] = 1.0

ax = transit_curve.plot(x='time', y='relative_flux')
sample_data.plot.scatter(ax=ax, x='time_adjusted', y='relative_flux', color='orange')


## 2.2 Switching to units of seconds and photons per second ##

expected_photons_per_second = 80000 # This is a random choice for now but not far off true data we'll use
seconds_in_day = 86400

# Convert time from days to seconds
transit_curve['time_seconds'] = list(map(int, round(transit_curve.time * seconds_in_day)))

# We only generated data for each 0.01 days, let's fill the curve for every second
def interpolate_transit_curve(curve):
    # Start with list of empty data points
    time_range = max(curve.time_seconds)
    data = pd.DataFrame({'time_seconds': list(range(0, time_range + 1))})
    relative_flux = [None] * (time_range + 1)

    # Fill each row that we have data for
    for index, row in curve.iterrows(): # Populate data we have
        relative_flux[np.int(row.time_seconds)] = row.relative_flux

    if not relative_flux[0]: relative_flux[0] = 1.0
    if not relative_flux[-1]: relative_flux[-1] = 1.0

    data['relative_flux'] = relative_flux

    # Fill in the gaps
    data = data.interpolate()

    return data

adjusted_transit_curve = interpolate_transit_curve(transit_curve)

# Changing y axis to photons per second
adjusted_transit_curve['photons_per_second'] = adjusted_transit_curve.relative_flux * expected_photons_per_second

adjusted_transit_curve.plot(x='time_seconds', y='photons_per_second')


### 3. Putting this all into python functions ###

# Change units to seconds and photons per second
def change_transit_curve_units(transit_curve, expected_photons_per_second):
    transit_curve['time_seconds'] = list(map(int, round(transit_curve.time * seconds_in_day))) # Convert time from days to seconds
    adjusted_transit_curve = interpolate_transit_curve(transit_curve) # Fill in missing data
    adjusted_transit_curve['photons_per_second'] = adjusted_transit_curve.relative_flux * expected_photons_per_second # Changing y axis to photons per second
    return adjusted_transit_curve

def curve_formula(x, relative_flux_range, transit_length_days):
    time_centre_of_transit = transit_length_days / 2
    cos_factor = (1.06 / transit_length_days) * 4.2 # This is just variable used in the equation for the curve

    # After fiddling around the below formula seems to fit for during the transit (but not outside)
    return 1.0 - relative_flux_range*(real_power(np.cos(cos_factor*(x-time_centre_of_transit)), 0.2))

# transit_length (in seconds) actually slightly longer than actual transit - includes some flat data either side
# expected_photons_per_second is for when no transit taking place
# relative_flux_range is the amount we want the curve to dip

def get_transit_curve(transit_length, expected_photons_per_second, relative_flux_range):
    second_in_day = 86400
    transit_length_days = transit_length / seconds_in_day
    time = np.arange(0.0, transit_length_days, 0.001) # List of times to fill with data points for curve

    relative_flux_curve = [curve_formula(x, relative_flux_range, transit_length_days) for x in time]
    transit_curve = pd.DataFrame({'time': time, 'relative_flux': relative_flux_curve})

    # Set all points outside of the transit to 1.0
    transit_curve.loc[transit_curve['relative_flux'] > 1, 'relative_flux'] = 1.0

    return change_transit_curve_units(transit_curve, expected_photons_per_second)

# Just a test. This is closer to what we'll be observing
get_transit_curve(10000, 80000, 0.0025).plot(x='time_seconds', y='photons_per_second')
Step 3: Simulating the observation of a transit
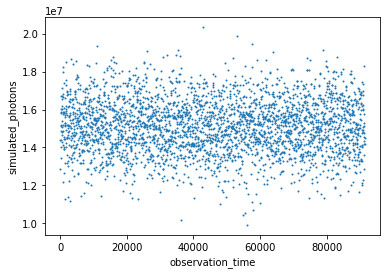
The first simulation was done using the parameters for the transit above: T = 1.06 days, A = 0.0053475. A data point was generated for every 30 seconds of data, simulating the photon count for a 20 second exposure based on the given curve. The data point was then shifted randomly up or down based on a normal distribution around that point with the standard deviation taken from part 1 above. In theory, we should have seen the data points dip and rise (in similar fashion to the curve they were generated from), but given the very large standard deviation relative to the change in flux, they came out looking quite random:
Step 4: Testing the data
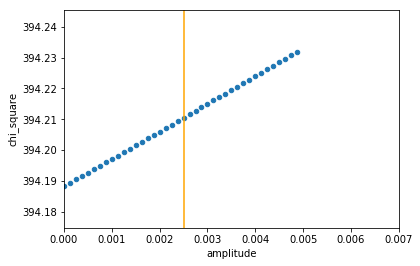
The question must now be asked: Does this data show anything, or is it just a random mess? To test this, we take a selection of curves of varying amplitudes (from zero change in flux to twice that of the expected change), and test which curve our data fits best against. Ideally, we end up with it fitting closest to the one in the middle (the amplitude we started with for our simulation).

For each curve, a chi-square test was done, comparing the simulated data to the curve. The chi-square statistic is defined as

where observedk are our simulated data, and expectedk are the expected data points taken from a curve. σ is the standard deviation.
In general, the lower the chi-square stat, the closer our data fits the model. So, what we hope to see as we vary our amplitude is that the chi square stat decreases (as amplitude increases from zero), hits a minimum at our “good” amplitude (about 0.05, which the data was generated from), and then begins to increase again as the amplitude grows larger. It turns out this is exactly what we saw! The orange line represents the amplitude we were hoping for:

It appears that the best fit for the random-looking simulated data is indeed the curve we were hoping for. This is good news for our chances of observation, but unfortunately this simulation was a bit unrealistic for our purposes: The upcoming transits that Mohyudding has found for us that we are hoping to observe are less than three hours long (the one above is closer to 25), and the dip in flux is around 0.25%, rather than 0.5%. Rerunning the simulation and chi-square testing with a 170 minute transit and amplitude of 0.0025, we get a slightly different result:

This isn’t too bad – it indicates that we would still detect the dip in flux, but perhaps would not be able to accurately measure the amount of dip (in this case it would have been over-estimated).
Unfortunately, there was still one final kick in the teeth awaiting us: The stars we are likely to observe are of around magnitude 11 (very dim). It seems that the dimmer the star, the worse our error in measurement. When retesting with the standard deviation of a magnitude 9 star (less dim, but still quite dim), we get this result:
Oh dear! This result implied that no amplitude (i.e. no transit at all) would be a better fit than any dip in flux, let alone the exact dip we were hoping for. Unfortunately, it seems that our errors are just too large to detect a transit accurately.
In conclusion, it seems that detected an exoplanet transit is going to be quite a challenge. We haven’t completely given up hope though: If we are lucky enough to have a clear sky on the right night, we might try to observe a transit using much longer exposure photographs. This will hopefully allow us to reduce the error in our readings.
Code:
### 0. Imports and constants ###

import pandas as pd
import numpy as np
import matplotlib.pyplot as plt
import os

seconds_in_day = 86400

# Data taken from star 14 in file A-luminosity-standard-deviations.ipynb
test_expected_photons_per_second = round(15158415.7/20)
test_standard_deviation = 1432719

# Data from the imported Kepler data in file B-exoplanet-transit-curve-function.ipynb
test_transit_time = 91584
test_relative_flux_range = 0.0053475457296916495


### 1. Functions to generate curves for simulating transits ###

# (mostly just copied from previous section) #


def interpolate_transit_curve(curve):
    # Start with list of empty data points
    time_range = max(curve.time_seconds)
    data = pd.DataFrame({'time_seconds': list(range(0, time_range + 1))})
    relative_flux = [None] * (time_range + 1)

    # Fill each row that we have data for
    for index, row in curve.iterrows(): # Populate data we have
        relative_flux[np.int(row.time_seconds)] = row.relative_flux

    if not relative_flux[0]: relative_flux[0] = 1.0
    if not relative_flux[-1]: relative_flux[-1] = 1.0

    data['relative_flux'] = relative_flux

    # Fill in the gaps
    data = data.interpolate()

    return data

# Change units to seconds and photons per second
def change_transit_curve_units(transit_curve, expected_photons_per_second):
    transit_curve['time_seconds'] = list(map(int, round(transit_curve.time * seconds_in_day))) # Convert time from days to seconds
    adjusted_transit_curve = interpolate_transit_curve(transit_curve) # Fill in missing data
    adjusted_transit_curve['photons_per_second'] = adjusted_transit_curve.relative_flux * expected_photons_per_second # Changing y axis to photons per second
    return adjusted_transit_curve

# Used for the formula version of transit curve. Returns x^n if x>=0, -(-x)^n if x<0 def real_power(x, exponent):     if x >= 0: return x**exponent
    else: return -(-x)**exponent

def curve_formula(x, relative_flux_range, transit_length_days):
    time_centre_of_transit = transit_length_days / 2
    cos_factor = (1.06 / transit_length_days) * 4.2 # This is just variable used in the equation for the curve

    # After fiddling around the below formula seems to fit for during the transit (but not outside)
    return 1.0 - relative_flux_range*(real_power(np.cos(cos_factor*(x-time_centre_of_transit)), 0.2))

# transit_length (in seconds) actually slightly longer than actual transit - includes some flat data either side
# expected_photons_per_second is for when no transit taking place
# relative_flux_range is the amount we want the curve to dip

def get_transit_curve(transit_length, expected_photons_per_second, relative_flux_range):
    transit_length_days = transit_length / seconds_in_day
    time = np.arange(0.0, transit_length_days, 0.001) # List of times to fill with data points for curve

    relative_flux_curve = [curve_formula(x, relative_flux_range, transit_length_days) for x in time]
    transit_curve = pd.DataFrame({'time': time, 'relative_flux': relative_flux_curve})

    # Set all points outside of the transit to 1.0
    transit_curve.loc[transit_curve['relative_flux'] > 1, 'relative_flux'] = 1.0

    return change_transit_curve_units(transit_curve, expected_photons_per_second)


### 2. Simulating observing a transit ###


def get_simulated_data(transit_curve, standard_deviation, observation_frequency=30, exposure_time=20):
    observation_times = list(range(0, transit_curve.shape[0]-exposure_time, observation_frequency))
    expected_photons, simulated_photons = [], []

    coeff_of_variation = standard_deviation / (max(transit_curve.photons_per_second)*exposure_time)

    for observation_time in observation_times:
        end_observation_time = observation_time + exposure_time
        curve_rows = transit_curve.loc[(transit_curve['time_seconds'] >= observation_time) & (transit_curve['time_seconds'] < end_observation_time)]         expected_photons_observed = int(np.sum(curve_rows.photons_per_second))         simulated_photons_observed = round(np.random.normal(expected_photons_observed, expected_photons_observed*coeff_of_variation))         expected_photons.append(expected_photons_observed)         simulated_photons.append(simulated_photons_observed)              return pd.DataFrame({         'observation_time': observation_times,         'expected_photons': expected_photons,         'simulated_photons': simulated_photons     }) test_curve = get_transit_curve(test_transit_time, test_expected_photons_per_second, test_relative_flux_range) test_simulated_data = get_simulated_data(test_curve, test_standard_deviation) test_simulated_data.plot.scatter(x='observation_time', y='simulated_photons', s=1) ### 3. Chi-square testing ### ## 3.1 The functions for chi-square stat and generating curves of varying amplitude ## # Get chi-square stat def get_chi_square(data, transit_curve, standard_deviation, observation_frequency=30, exposure_time=20):     observation_times = data.observation_time          expected_photon_counts_from_curve = []       for observation_time in observation_times:         end_observation_time = observation_time + exposure_time         curve_rows = transit_curve.loc[(transit_curve['time_seconds'] >= observation_time) & (transit_curve['time_seconds'] < end_observation_time)]
        expected_photon_counts_from_curve.append(int(np.sum(curve_rows.photons_per_second)))

    simulated_photon_counts = data.simulated_photons

    variance = standard_deviation**2
    chi_square = np.sum(np.square(simulated_photon_counts - expected_photon_counts_from_curve)) / variance

    return chi_square

# Generate list of transit curves, all paramters kept the same except amplitude (demonstrated below)
def get_curves_to_compare_against(transit_length, expected_photons_per_second, expected_relative_flux_range, number_of_curves=40):
    curves = []
    for flux_range in np.arange(0, expected_relative_flux_range*2, (expected_relative_flux_range)*2/number_of_curves):
        curves.append(get_transit_curve(transit_length, expected_photons_per_second, flux_range))
    return curves

# Get list chi squares for simulated data tested against varying curves
def get_multiple_chi_squares(data, transit_length, expected_photons_per_second, relative_flux_range, standard_deviation, number_of_curves=40):
    curves = get_curves_to_compare_against(transit_length, expected_photons_per_second, relative_flux_range)

    chi_square = []
    amplitude = []
    for curve in curves:
        chi_square.append(get_chi_square(data, curve, standard_deviation))
        amplitude.append(max(curve.relative_flux) - min(curve.relative_flux))

    return pd.DataFrame({'chi_square': chi_square, 'amplitude': amplitude})


## 3.2 Testing these out with the paramaters used for the actual transit in file B ##

# A demonstration showing all the curves I am comparing the simulated data against
curves = get_curves_to_compare_against(test_transit_time, test_expected_photons_per_second, test_relative_flux_range)
for curve in curves: plt.plot(curve.time_seconds, curve.relative_flux)

test_chi_square_df = get_multiple_chi_squares(test_simulated_data, test_transit_time, test_expected_photons_per_second, test_relative_flux_range, test_standard_deviation)

test_chi_square_df.plot.scatter(x='amplitude', y='chi_square')
plt.xlim([0, 0.011])
plt.axvline(x=test_relative_flux_range, color='orange')


## 3.2 Testing with more realistic parameters ##

# Similar to my previous simulated data but with much fewer points due to less time to observe
transit_time = 10000 # Rounded up to account for the flat parts of the curve at either end
relative_flux_range = 0.0025
transit_curve = get_transit_curve(transit_time, test_expected_photons_per_second, relative_flux_range)
simulated_data = get_simulated_data(transit_curve, test_standard_deviation)
simulated_data.plot.scatter(x='observation_time', y='simulated_photons', s=1)

chi_square_df = get_multiple_chi_squares(simulated_data, transit_time, test_expected_photons_per_second, relative_flux_range, test_standard_deviation)
chi_square_df.plot.scatter(x='amplitude', y='chi_square')
plt.xlim([0, 0.007])
plt.axvline(x=relative_flux_range, color='orange')


## 3.3 Testing with worse standard deviation ##

standard_dev = 3*test_expected_photons_per_second*20
x_simulated_data = get_simulated_data(transit_curve, standard_dev)
x_simulated_data.plot.scatter(x='observation_time', y='simulated_photons', s=1)

chi_square_df = get_multiple_chi_squares(x_simulated_data, transit_time, test_expected_photons_per_second, relative_flux_range, standard_dev)
chi_square_df.plot.scatter(x='amplitude', y='chi_square')
plt.xlim([0, 0.007])
plt.axvline(x=relative_flux_range, color='orange')
